Some terms commonly used in documentation for GeoDocs 8:
Admin Side – location of many administrative functions of GeoDocs, such as managing topics, templates, and users, are not yet migrated to the GeoDocs 8 style interface but will gradually be upgraded during 2010-2011. During migration features will be available from both the ‘admin side’ and the ‘front end’. The ‘admin side’ can be accessed from the GeoDocs toolbar button for 'Site Tools' or from the site address with /gd/admin added after the basic address. (i.e. – http://mygeodocswebsite.com/gd/admin)
Browser - an application use to access and display information on the Internet, such as Internet Explorer, Firefox, Chrome, or Safari.
Caption- is short and descriptive text that labels a page, menus, links, images, and/or documents.
Content - When using the Page Contents plug-in, content usually refers to “text” or “graphics” although you can also embed a link within the text (a content link). Content can also refer to documents accessed within GeoDocs.
Content Management- is computer software used for organizing and facilitating collaborative creation of documents and other content.
Document Explorer- stores and organizes all external documents and images used or referenced throughout your GeoDocs site.
Document Management - Provides a means for management of documents in folders on the web server so that they can be used in a variety of ways on the website, such as images or document links.
Dynamic Page- any web page that has content or other objects that change automatically upon the creation of new content that meets the filter requirements for that page, as opposed to a static page where content must be manually added or removed.
Edit Mode – this viewing mode adds geodes to the page wherever content, sections, or menus can be changed, along with icons indicating the editing status of the page and all elements. Any changes to pages, sections, menus, or content can only be made in Edit Mode. An ‘Edit’ button in the top toolbar allows logged in editors to view Edit Mode.
Front end – refers to the GeoDocs 8 updated interface approached from the website or intranet. Initially some features will be located here, while others will be accessible from the ‘Admin Side’. Features are being migrated to the ‘Front End’ gradually during 2010-2011.
Geode - GeoDocs green and grey logo. An interaction point, a geode activates available option lists on the web page when in edit mode.
Links – Links are navigation buttons that usually transfer the user to a different area of the web site. With the Link Tools, you can manage these types of links: Internal, External and Documents. Links may be created using text or images.
1. Content Links- text links located in content
2. Document Links- links to documents, images, etc.
3. External Links- links to websites outside the internal website
4. Internal Links- link inside the internal website
5. Menu Links- links located in a menu
Live Mode – this viewing mode allows logged in editors to see what the current published version of the site looks like. This is turned on via a button in the top toolbar. By changing between Preview and Live modes, an editor can compare the current site to the effects of publishing changes.
Menu – Provides a means for site navigation. A menu contains links that identify specific locations within your site. Usually located on the top or left of the site structure, menus can also be placed in a right or bottom of a page. GeoDocs will accommodate horizontal menus, vertical menus and may be customized to provide other styles if desired.
Meta Data – Metadata is definitional data that provides information about, or documentation of, other data managed within an application or environment.
Meta Tags - Meta tags are used by search engines to allow them to more accurately list your site in their indexes. Meta tags are automatically created by Meta Data for pages and content on pages.
Page – A page consists of the entire image that appears on the screen. The page may contain one or more sections, one or more content records, and one or more menus containing multiple links for navigation.
Plug-Ins – Plug-ins are modular components that add functionality to a GeoDocs website. Plug-ins provide the code that handles retrieving data and formatting it to match the template that displays the data on the page. AWH has a library of pre-built plug-ins (Calendar, Contacts, Custom Links, FAQ, and RSS/Syndication) to meet a variety of needs. AWH can also customize a plug-in to meet your unique business requirements. In many cases this could be thought of as custom content types.
Preview Mode – this viewing mode allows logged in editors to see what the site would look like if all changes were published and a visitor has the correct permissions to view the site. It is equivalent to Edit Mode without the geodes appearing. No changes can be made from Preview Mode. A ‘Preview’ link in the top toolbar turns on this view.
Pop-Up- a form of advertising on the Internet that is used to increase web traffic and/or capture email address.
Pop-Up Blocker- blocks pop-ups from appearing on your screen.
Search Engine- a program designed to help locate information on the Internet. It allows you to ask for content meeting specific criteria- a word or phrase, and retrieves a list of references that match those criteria.
Section – A section is an area of content within a page. It drives the actual visual representation (section) inside the page. Sections are the user interface portion of a plug-in.
Site- a collection of pages common to a domain name on the Internet.
Spiders- many search engines use spiders to gather web pages for indexing. Spiders follow links on a webpage in a process called gathering.
Static Page- Contains content or other objects do not change automatically, but must be updated manually. The opposite of this is a dynamic page, where new content automatically appears if it meets certain criteria.
Subscriptions - Allows a user to define notification relationships to topics. A user has the ability to subscribe to a notification service (email) when content changes are made to topics of interest. Available in Professional and Enterprise Editions.
Taxonomy- a system used for the classification of animate and inanimate objects into a hierarchy of rank and organization.
Template – GeoDocs uses ‘Templates’ in the creation of web pages. Each area in the web page is controlled by a template. The template mandates how information appears in each area (format, font, color, size, etc.). Every web page has a page template, one or more menu templates and one or more section templates
Toolbar- horizontal floating menu that appears at the top of the browser window while a user is logged in. Depending on user role, the toolbar contains access to personal profile and password functions, as well as editing, user administration, and document storage functions of the GeoDocs application.
Topics - the classification system for subjects of interest that a user may want to subscribe to. Topics that a user may want to subscribe to are defined in Topic Lists available in the user profile (My Page Portal) component of GeoDocs. Available in Professional and Enterprise Editions.
Versioning – Tracks activity of content and/or document changes. Multiple copies will be retained in the active archive, allowing for “roll-back” to previous copies. Available in Enterprise Edition.
Workflow – The ability to define steps and routing that must be performed to complete a specific business process. Workflow facilitates electronic notification, review and approval of submitted work by allowing various resources to participate in a specific process flow (e.g. Expense report document must be completed by employee, routed to their immediate supervisor for approval – or rejected and returned to employee with attached comments – and then forwarded to HR and Payroll for processing). Available in Enterprise Edition.

Tutorials, documentation, and tips to get the most out of your GeoDocs website or intranet.
Dec 9, 2010
Dec 3, 2010
Content Properties
While each content type has custom fields (such as 'location' for Calendar items), all content share certain common properties that are used to categorize and manage your content in GeoDocs.
To view the properties for a piece of content:

You will see this window (note that there is no 'save' button at the bottom unless you have the content checked out to you):
Content Details Tab (properties can be changed manually) :
Security Tab (properties cannot be manually edited):
*Title is also a common property across all content types, but it is not managed through the 'view content properties' interface.
Site Editing and Maintenance
To view the properties for a piece of content:

- Log in
- Click EDIT in the top toolbar to change to Edit Mode
- Click the content geode and choose 'View Content Properties' in the dropdown
You will see this window (note that there is no 'save' button at the bottom unless you have the content checked out to you):
 |
| Content Details Tab in View Content Properties |
 |
| Security Tab in View Content Properties |
Content Details Tab (properties can be changed manually) :
- Topics
- Metadata
- Group Owner
- Active/Inactive
- Public/Non-public
- Display Start Date/Time
- Display End Date/Time
- Priority
- Send Next (yes/no)
Security Tab (properties cannot be manually edited):
- Created Date
- Content ID
- Created By
- Modified Date
- Modified By
*Title is also a common property across all content types, but it is not managed through the 'view content properties' interface.
To edit the properties, you must have the content checked out to you. You can then edit the properties from the 'View Content Properties' window, or open the piece of content by selecting 'Edit' in the content geode menu. In both cases you will now have the option to save your changes.
How these properties are used to manage your content
Security
- Group Owner - control who can edit the content, or who can view it if it's non-public
- Public/Non-public - if this box is checked, content is public and can be seen by anyone with access to your website. If the box is unchecked the content will only appear to visitors who are logged in and a member of the group selected in 'Group Owner'.
Dynamic Display
- Display Start and End can be used to automatically make content appear and disappear from the site on a schedule you set. The start date is often used by dynamic sections for sorting order (newest to oldest).
- Dynamic sections can be programmed (by a developer, not by an author) to sort by many different properties, such as start date, created date, modified date, priority, or one of the custom fields of the content type such as 'event start date' for Calendar items.
- Dynamic sections always use content type, topics, and date range as filters to determine which content will display within them.
Site Editing and Maintenance
- Active/Inactive - this property allows you to make content show only in edit and preview mode so that you can publish a page you're working on without publishing all of its content, or hide content from the users while it is being worked on. When the content is ready to be seen, just check the box to set it to 'active' again and then publish the content and it will appear on your site again.
Oct 28, 2010
How to Delete a Section
There are two different ways to remove a section from the page. The section can be completely deleted from the system or just removed from the page so that it remains available in the database for assignment to another geode. Neither of these methods deletes the content within the section, kind of like how you can throw away a picture frame but still keep the pictures inside.
To remove the section from the page but leave it available in the database:
1. Click on the section geode for the section to be deleted.
2. Choose "Delete Section - "remove from page".
 3. In the popup, click on "Yes, remove the section" to approve the change.

Note that the page status in the top toolbar now shows a pencil. The section will be immediately removed from the geode in edit mode, but will still appear on the live site until the page is published. This makes it possible to remove a section and replace it with a new section in the same publishing step.
4. Publish the page. Your removed section is still available in the database to be assigned to pages in the future.
To completely delete the section from the system
1. Click on the section geode for the section to be deleted.
2. Choose "Delete - Delete from system"

3. In the popup, select "Yes, delete the section"

Deletion steps in GeoDocs must be published or approved in workflow, so the section geode will now show a red circle icon indicating that it is marked for deletion. (This picture shows the yellow label that appears when the geode is moused over without clicking)

4. Publish the page to complete deletion of the section. The section is deleted from the page and from the database and will no longer appear as an option when assigning an existing section to a geode.
To remove the section from the page but leave it available in the database:
1. Click on the section geode for the section to be deleted.
2. Choose "Delete Section - "remove from page".


4. Publish the page. Your removed section is still available in the database to be assigned to pages in the future.
To completely delete the section from the system
1. Click on the section geode for the section to be deleted.
2. Choose "Delete - Delete from system"


Deletion steps in GeoDocs must be published or approved in workflow, so the section geode will now show a red circle icon indicating that it is marked for deletion. (This picture shows the yellow label that appears when the geode is moused over without clicking)
4. Publish the page to complete deletion of the section. The section is deleted from the page and from the database and will no longer appear as an option when assigning an existing section to a geode.
Oct 27, 2010
How to Reorder Sections on a Page
If you want to move a section up or down, higher or lower on a page, you must delete sections from the page to make the geodes available, and then add them back in the order you want them.
- Take note of the section names and types so you can find them (mouse over their geodes)
- Delete the sections from the PAGE (not from the system) that you need to get out of the way
- Publish the page
- Assign those sections back in the order you want them.
Change Text Into a Link
The WYSIWYG editor makes it easy to transform text into a link to a web page or to a document with a web address. For example, here is an introduction to the features of the WYSIWYG editor.


Parent = only used in sites that use frames. You probably won't use this. Top= like 'parent' this is only used in sites with frames, so you probably won't use it.


You can create a l ink for an internal page, an internal document, or an external document or web address.
To create a link:
- Highlight the text where you want to embed the link.
- Click the icon that looks like a geode, and a popup will appear.

3. Select your link

To link to an internal page on your GeoDocs website, from the tab labeled "Internal Page" click through your navigation until the page you want is highlighted.

To link to an internal document, click the tab marked "Internal Document" and then navigate to highlight the file you want.

To link to an external page or document, click the tab marked "External Item" and paste the address (with http:// or https://) into the field.
4. Select your target

None = doesn't assign a property, so goes to the default behavior for your site or browser
Blank = open link in new window (leaves your site open in the original window)
Self = open link in same window (navigate away from your website in the same window)
5. Click 'Select Link' at the bottom of the window, and voila, your text is now a link.

How to unlink text:
- Highlight the text to be unlinked
- Click on the icon that looks like a globe with a chain link in front.

Oct 26, 2010
Formatting Text with the WYSIWYG Editor
The WYSIWYG editor allows you to format text just like you were working with a word processing program, such as Microsoft Word.
To remove formatting, simply highlight the text, and then click the eraser next to the BOLD symbol. When you mouse over the eraser a text window reads 'remove format'.

The editor does not allow you to change text font, color or size or the background color so that content authors keep the site as consistent looking as possible. However, there are several pre-loaded formats in your website that will allow you to make formatting changes that are consistent with the rest of the site.
These are found in the dropdown in the editor toolbar. Your options are 'normal', 'Heading 1' through 'Heading 6', 'formatted', 'address', and 'Normal (DIV)'. Depending on how your site is styled, these may do something and they may do nothing. Note: When you view your text inside the WYSIWYG, you'll see it styled the way it is in the dropdown, but it will look different on the page if your page template has these headings configured differently.

Why does GeoDocs work this way? One great thing about a content management system is that you can take the same piece of content and use it over and over again, and it can change styles to match the page where you're viewing it. So we use a collection of styles called 'heading 2' or 'h2' instead of "green, bold, and 14 pt font" so that h2 can be a different set of styles on different pages. This is also useful if you ever want to restyle your site you can just change the settings for all these headings and you don't have to edit every piece of content to match the new look.
- Highlight the text you want to change, or position the cursor on the line where you want to begin typing with the formatting.
- Click the appropriate buttons for the desired format change. (Or use keyboard shortcuts in some cases)
- Bold (Ctrl+b)
- Underline (Ctrl + u)
- Italics (Ctrl + i)
Strikethrough- Numbers
- Bullets
- Indent
- Quotes
- Align text right, left, center, or justify (align right and left)
- Subscript
- Superscript
To remove formatting, simply highlight the text, and then click the eraser next to the BOLD symbol. When you mouse over the eraser a text window reads 'remove format'.

The editor does not allow you to change text font, color or size or the background color so that content authors keep the site as consistent looking as possible. However, there are several pre-loaded formats in your website that will allow you to make formatting changes that are consistent with the rest of the site.
These are found in the dropdown in the editor toolbar. Your options are 'normal', 'Heading 1' through 'Heading 6', 'formatted', 'address', and 'Normal (DIV)'. Depending on how your site is styled, these may do something and they may do nothing. Note: When you view your text inside the WYSIWYG, you'll see it styled the way it is in the dropdown, but it will look different on the page if your page template has these headings configured differently.

Why does GeoDocs work this way? One great thing about a content management system is that you can take the same piece of content and use it over and over again, and it can change styles to match the page where you're viewing it. So we use a collection of styles called 'heading 2' or 'h2' instead of "green, bold, and 14 pt font" so that h2 can be a different set of styles on different pages. This is also useful if you ever want to restyle your site you can just change the settings for all these headings and you don't have to edit every piece of content to match the new look.
Intro to the GeoDocs Text Editor
Most content types in GeoDocs 8 allow you to create rich text with links, images, and more using a 'what you see is what you get' text editor, or 'WYSIWYG' for short. This article will give you an overall intro to the editor. Links are provided when more detail is needed on particular features.
You must be a content author or site author within a group in order to open content for editing. The easiest way to know is to look at your GeoDocs toolbar when you're logged in. If you see buttons for EDIT, PREVIEW, and LIVE modes, then you are a content or site author in at least one group.
 |
| Edit-Preview-Live Buttons in GeoDocs 8 |
Here is the editor, with buttons labeled. (Click to enlarge picture)
 |
| GeoDocs 8 Content Editor with buttons labeled |
Most functions within the editor allow a person with little or no experience with websites to edit content. It's not too different from working with a word processing program like Microsoft Word. There are just a few extra functions you might not use in Word because now you're dealing with web content.
Here are some of the things you can do with the WYSIWYG editor (click to go to instructions):
Most common or easy to use functions
- Format text - bold, italics, underline, strikethrough, numbers, bullets, indent, quotes, justify right/left/center, subscript, superscript, and title formatting. (and remove formatting)
- Insert picture
- Create links - embed a link within a word or phrase
- Copy, paste, or cut text
- Copy text from a file, or specifically Microsoft Word (strips out formatting)
- Check spelling or find and replace words
Advanced users (may require some knowledge of HTML)
- Edit the HTML directly
- Use HTML templates
- Insert tables, lines, symbols, and page breaks
- Create anchor
Oct 5, 2010
How to Remove Content from a Dynamic Section
Dynamic sections display content based on the properties the section is searching for. For example, a calendar list section might display all events with the topic "Training". This article shows how to make content stop showing in a particular section, but still keep the content in the database. If you want to delete the content altogether, that's something different.
To remove content from a dynamic section you must change the content's properties. First, we need to understand what properties the section is looking for.
Log in
Turn on Edit Mode (top toolbar)
Left-click the section geode, and choose 'View Section Properties'.
Look at all three tabs. Find which properties are driving the section. The most common is Topics, but it could also be start/end date or another parameter. Close the popup.
Now, on the geode of the content you want to remove, click and choose 'Check Out'. Click 'Okay' in the popup.
Click the geode again and choose 'View Content Properties'. Change the property or properties that are causing the content to display in the section. Click Save.
How to Delete Content from a Static Section - GeoDocs 8
You must be a site author to delete content from a section.
How to delete content from a section:
How to delete content from a section:
- Log in
- Turn on Edit Mode (top toolbar)
- Left-click on the geode for the content you want to delete. Choose 'Check Out', then click Okay in the popup window that appears. The page will refresh, showing a lock next to the content geode.
- Choose 'Delete Content' - 'Remove from Section'.
- In the popup, click 'Yes, remove the content'
- Publish the page or submit to workflow (Page menu)
How to delete content from the system:
- Log in
- Turn on Edit Mode (top toolbar)
- Left-click on the geode for the content you want to delete. Choose 'Check Out', then click Okay in the popup window that appears. The page will refresh, showing a lock next to the content geode.
- Choose 'Delete Content' - 'Delete from System'.
- In the popup, click 'Yes, delete the content' (The page will refresh with a red icon next to the content showing it's marked for deletion)
- Publish the page or submit to workflow (Page menu)
How to undo delete:
- Make sure content is checked out
- Select 'Delete Content' - 'Undo Delete Content'. The page will refresh with the content in a checked-out state.
How to Delete a Page
You must be a site author in the group that owns the page.
Upon publishing or approving the page, the page will refresh and you will see either a page error or a 404, or be redirected somewhere, depending on how your site is configured.
- Log in and navigate to the page to be deleted. (Page < Open is a fast way to do this)
- Turn on EDIT mode in the top toolbar.
- In the toolbar, select Page < Delete
- Are you sure? Click Yes. The page will reload and the status icon in the toolbar will now include a red circle. The page is not yet deleted, it is just marked for deletion.
- Publish the page (Page < Publish) or send it to workflow (Page < Workflow < Submit)
- If you have workflow, the page still must be 'Approved' and then it will delete and no longer appear on your site.
Upon publishing or approving the page, the page will refresh and you will see either a page error or a 404, or be redirected somewhere, depending on how your site is configured.
Oct 4, 2010
Changing Page Properties - GeoDocs 8
There are many reasons you may want to change a page's properties. You want to move a page, or change the title, or switch to a different template. That's all in the Page Properties. You must have the role of 'site author' in the group that owns the page in order to change page properties or publish the page. If your site uses workflow you may also need to be a workflow approver to complete this process.
Where to change the properties?
- Log in
- Click the PAGE button in the toolbar, then select 'View Page Properties' in the dropdown menu. A popup will appear, with information organized on three tabs.
- Make the property change (more detail below)
- Click SAVE. The popup will close.
- Go back to the PAGE button in the toolbar and in the dropdown menu, either click 'Publish' if you don't have workflow, or 'Workflow < Submit' if you do have workflow. (an approver will then need to go to the page menu and select "Workflow < Approve")
 |
| Page Menu in GeoDocs without Workflow |
First tab: Describe this page
- Change the page title - on the first tab, type in the new name.
- Change the page name that appears in menus - change the page 'caption' on the first tab.
- Make a page private or public - check or uncheck the 'Public' box. If the box is unchecked (non-public) then only users in the owning group can see it and only when they're logged in.
- Turn off or inactivate a page - uncheck or check the 'Active' box. Inactive pages can only be seen by site authors while logged in and if they're a member of the group that owns the page.
- Change page description - the 'Meta Data' field may feed the page's HTML description. This depends on how the page template is designed.
- Change metadata for search engine optimization (SEO) - Again, the 'Meta Data' field on the first tab.
Second tab: Where does the page belong on this site?
- Move a page to a new location in the sitemap - select the middle tab and simply highlight the page that you want this page to go UNDER.
Third tab: Images
- Change the banner image on a page. (Not all templates are designed to do this.) - use the link selector tool to choose a new document (image) for the banner. Note that only files cropped at exactly the right dimensions will work, not just any image in the system.
 |
| Page Properties Pop-up Window - click to enlarge |
Page Structure in GeoDocs
GeoDocs uses three levels of structure on a page:

- PAGE - the page properties include which template to apply, the name of the page, and where it should be located in the site. Only site authors can change page properties, or delete or create pages.
- SECTIONS and MENUS - these are like frames for content and links. Only site authors can add or remove sections/menus or make changes to their properties.
- CONTENT - text, links, calendar entries, etc. And sometimes documents. Document authors can create, delete, or change properties of file-based content. Content authors can create, delete, and change content of any kind.

Sep 30, 2010
Moving a Document in GeoDocs 8
- Click on FILES in the GeoDocs toolbar.
- Navigate to the document to be moved.
- Click the document file name, and choose 'Edit' in the dropdown menu.
- In the window that appears, there are tabs at the top. Go to "Where does the document belong?". The current location will be highlighted.

- Navigate through the folders and highlight the folder where the document should go.
- At the bottom, click Save or Check In or Submit to Workflow (Enterprise Only).
- Follow the appropriate steps to publish the document.

- Save, then Check In, then Publish (or Submit to Workflow then Approve)
- Check In, then Publish (or Submit to Workflow then Approve)
- Submit to Workflow, then Approve.
Note: if you click Cancel your document will remain checked out. If you do not wish to make changes at this time, find the document in Document in Explorer. Click to show the menu and select Undo Checkout to check it back in with no changes.
Document Properties in GeoDocs 8
Documents can carry many properties in GeoDocs 8. To see the properties of a document:
In the top toolbar, click "FILES" to open Document Explorer
Navigate to the file you want to investigate
Left-click on the file name. In the dropdown that appears, choose the last option "View Content Properties"
The popup window that appears shows properties. Click the tabs at the top to see more.
CONTENT DETAILS Tab
To change a document's properties, such as topics or group ownership, you must first 'check out' the document and THEN view its properties. When the document is checked out to you, there will be a SAVE button at the bottom of the Properties window.
Alternative Route:
If you are in the group that owns a document, you can also see and edit a document's properties if you click on the file name and choose EDIT. This will open the above mentioned tabs, as well as a tab that will allow you to change the location of the document or upload a new version.
In the top toolbar, click "FILES" to open Document Explorer
Navigate to the file you want to investigate
Left-click on the file name. In the dropdown that appears, choose the last option "View Content Properties"
The popup window that appears shows properties. Click the tabs at the top to see more.
CONTENT DETAILS Tab
- Topics - any piece of content must have at least 1 topic assigned
- Metadata (free form information that can be used to improve search engine rankings or just simply describe the document to help other users)
- Group Owner
- Status: Active/Inactive and Public/Non-public
- Start and End Date (to set limits on when the document is available to site visitors)
- Priority (may be used for subscriptions/alerts or to sort lists of documents)
- Send Next (if this box is checked, the next time a new version of the document is published, the system may send emails to notify users if they are subscribed to receive such alerts)
- Content ID
- Created Date
- Created By (user)
- Modified Date
- Modified By (user
- If you have document versioning turned on, you will see a list of all prior versions of the document. Click 'view' on the far right column to open older versions.
To change a document's properties, such as topics or group ownership, you must first 'check out' the document and THEN view its properties. When the document is checked out to you, there will be a SAVE button at the bottom of the Properties window.
Alternative Route:
If you are in the group that owns a document, you can also see and edit a document's properties if you click on the file name and choose EDIT. This will open the above mentioned tabs, as well as a tab that will allow you to change the location of the document or upload a new version.
Aug 27, 2010
Adding a section to a page - GeoDocs 8
To add sections to a page, you must be assigned the role of "Site Author" in the group that owns the page.
For dynamic templates, two more tabs will become active.
6. Save the section
7. Publish the page
Related posts:
Page structure in GeoDocs
- Click on EDIT mode (top toolbar)
- Mouse over the geodes to identify the right kind: Menu or Section. Geodes will only work for one or the other and can't be switched. This maintains consistency in page layout.
- Click on a geode and choose 'Section > New Section'
- Choose a caption (depending on the template, this may or may not appear on the page, but you will use this name to find the section if you reuse it on another page)
- Choose a template
For dynamic templates, two more tabs will become active.
- Dynamic Filter: choose groups and topics to filter content
- Display Window: choose priority, date range and other options (Calendar sections will also allow filtering by event date)
6. Save the section
7. Publish the page
Related posts:
Page structure in GeoDocs
Adding a menu to a page - GeoDocs 8
To add menus to a page, you must be assigned the role of "Site Author" in at least one group.
1. Click on EDIT mode (top toolbar)
2. Mouse over the geodes to identify the right kind: Menu or Section. Geodes will only work for one or the other and can't be switched. This maintains consistency in page layout.
3. Click on a geode and choose 'Menu > New Menu'
4. Choose a caption (depending on the template, this may or may not appear on the page)
5. Choose a template
6. Save
7. Publish the page
Create a new page or copy an existing page - GeoDocs 8
To create a page or to add sections or menus to a page, you must be assigned the role of "Site Author" in at least one group.
To create a new blank page (no menus or sections):
To make a page with the same menus as another page, you can start this process by navigating to a page with the same menus you want, then choose PAGE < COPY and complete the other steps. You will create a copy of the page, but with no sections. If you have several menus on the page this can save a lot of time.
To create a new blank page (no menus or sections):
- Click the EDIT mode button
- Go to PAGE < New Page
- Give the page a title, caption, and unique name
- Title: most websites follow the convention of "page name - site name" (eg - "US Politics - The New York Times")
- Caption: this is what will show in menus
- Unique name: this will become the end of the page URL and can only be used once in the system
- Choose other options, such as page template, public or private, etc.
- On the next tab, navigate to choose a location for the page. It will appear as a sub page (or child) of the highlighted page
- Save the page - you will see a page with just the background images and geodes at all locations available to add menus or sections.
To make a page with the same menus as another page, you can start this process by navigating to a page with the same menus you want, then choose PAGE < COPY and complete the other steps. You will create a copy of the page, but with no sections. If you have several menus on the page this can save a lot of time.
Aug 13, 2010
How to add a Twitter Widget to your GeoDocs™ website
Putting a Twitter widget on your website is easy and can be a great way to keep it looking fresh, connect your website with your social media campaign, or to allow you to update your website from your phone! The WYSIWYG editor in GeoDocs makes it easy to add a widget to your site.
- Find and prepare the HTML code for your widget
- Twitter provides several different kinds of widgets on their site, with lots of different color options or no frame at all. http://twitter.com/goodies/widgets
- Choose Widgets for...My Website
- Play around with the settings until you like what you've got, and click "Finish & Grab Code". Keep that page open and start the next step in a different browser window so you can go back and forth if you need to.
- Twitter provides several different kinds of widgets on their site, with lots of different color options or no frame at all. http://twitter.com/goodies/widgets
- Log in to your GeoDocs website and switch to edit mode (or WebView Editor in GeoDocs v.7)
- Open a page where you want to add the widget (page>open)
- Add a section to the page at the Geode where you want a widget to go
- This can be any section type that will display the BODY field from content items- summary content, summary plus
- Remember- this section won't appear on the page until there is content in it and the page has been approved
- You must be a site author to add sections to a page! If you're not, have a site author perform this step and you'll be able to continue from here if you're a content author.
- This can be any section type that will display the BODY field from content items- summary content, summary plus
- Add new content item. From the section Geode dropdown (left click for v.8, right click for v.7), select 'Add new content'.
- Give your content a title and topic
- Give your content a title and topic
- Add the html code to the body
- In the body field (WYSIWYG editor), click the button to see the source code. This will be blank if you have nothing in the body yet.
- NOW go copy your code for the Twitter widget and paste it here.
- Click the source code button to return to normal editing mode. (This is very important! The editor might not save the code correctly if you skip this step)
- You'll notice that all you see is a blank white field, and you might worry that it didn't take, but it's there!
- In the body field (WYSIWYG editor), click the button to see the source code. This will be blank if you have nothing in the body yet.
- Save your new piece of content
- After saving the content, your brand new widget will display on your page in edit or preview mode (hit the F5 key if you don't see it right away)
- If you're happy with your widget, then run it through workflow (Enterprise only) or publish it so everyone can see it!
- You may find that you need to tweak the dimensions or reduce the number of tweets to make it fit well on the page. You can go back to Twitter's tool or try reading the code- even if you're a novice you'll probably recognize what the code means.
- After saving the content, your brand new widget will display on your page in edit or preview mode (hit the F5 key if you don't see it right away)
Aug 11, 2010
Uploading a document through Document Explorer
1. While logged in, click on the 'Files' button on your top toolbar. (if you don't see this button, then you probably aren't a 'document author' or 'content author' role in any groups)
2. In the new window that opened, go to the top right and click on the blue document icon with the green plus sign (it will say 'Create Content' if you mouse over it). A smaller popup window will appear.

Note: You don't need to navigate to a folder before doing this. You will choose a location in the next step.

3. Choose a file to upload and fill out the document's properties (not all are required).
4. Continue to each tab and fill out the necessary fields. When you are finished, you can choose either SAVE or SAVE AND CHECK IN.

5. If you have workflow, choose workflow ~ submit to workflow. Then a 'workflow approver' can publish the document.
3. Choose a file to upload and fill out the document's properties (not all are required).
Notes:
* The File Name will be used to represent the document in Document Explorer, but the Title is probably what site visitors will see, depending on how the document sections are built on your website- they may display File Name, File Title, or both.
* Comments are notes for someone editing the document later. Most docs probably don't need them.
* Keywords will automatically appear in the header on any pages where that document appears. This is to help your site be better understood by search engines, if their content isn't already indexed anyway by search engines. (Example: Document types read by Google)
4. Continue to each tab and fill out the necessary fields. When you are finished, you can choose either SAVE or SAVE AND CHECK IN.
OPTION 1: 'SAVE' to upload the document but keep it checked out to you. Your document will have a pencil and a lock. To publish this you'll have to first check it in.
- CHECK IN – left click on the document name and select CHECK IN from the dropdown menu. You'll see the comment box and click 'Check In'.
- PUBLISH – left click on the document again and select PUBLISH. Comment if you like, then click 'Publish'.
OPTION 2: Select 'SAVE and CHECK IN' to upload and check in with one step. You will be given the opportunity to comment, and then click 'Check In' to complete the process. The document will have only a pencil icon, and is ready to publish.

- PUBLISH – left click on the document and select 'Publish' from the dropdown menu. Comment box appears, click 'Publish'.
The GeoDocs 8 Toolbar
Once logged in, users will see a toolbar that floats at the top of the screen.
Site Author and Content Author toolbar: (full toolbar) includes Page, Files, Status, Edit/Preview/Live, RSS Builder, Site Tools, Change Password, User Name, and Logout button.

Document Author Toolbar: omits the Status field, does not have Edit/Preview/Live or RSS Builder buttons.
The Member Toolbar only has two buttons: Logout and Change Password.
The features available on the toolbar are based on the highest role the user has in any group, so if a user is just a Member in one group but a Site Author in another group, that user will see the full Site Author toolbar. Certain options in the Page menu dropdown will be greyed out for Content or Document Authors, such as 'Delete Page'.
(More about User Roles)

Page Button : Opens dropdown menu of page options including New, Open, Copy, Delete, Publish, Workflow, and View Properties. Only a Site Author will have access to the complete menu, and only while in Edit Mode. (More about Pages and Site Authors)
 Files Button: Opens the Document Explorer for file management including upload, edit properties, and view versions (Enterprise License only). (More about Document Explorer)
Status Icons
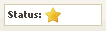 Gold Star: Everything on the page has been published and is live on the site. (Preview and Live modes match)
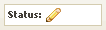 Pencil: Something has been edited since the last published version. This could be new/changed content, section, menu, or page. This icon will also display if the page has never been published.
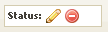 Pencil with Red Circle: Either the page or a piece of content has been marked for deletion. (Deletion is completed when the page or content is published)
 Edit/Preview/Live: Allows Content Authors and Site Authors to view the page in three different 'modes' for editing, previewing changes, and viewing the live site.
 RSS Builder: Opens a popup window that guides users through creating an RSS feed based on content author groups, topics, and other parameters and provides a URL to the RSS feed. (Future post: More about RSS Builder)
 Site Tools: Opens a new browser tab to view other administrative features, such as user administration, topic administration, and Site Map controls. (Future post: More about Site Tools)
Site Author and Content Author toolbar: (full toolbar) includes Page, Files, Status, Edit/Preview/Live, RSS Builder, Site Tools, Change Password, User Name, and Logout button.
Document Author Toolbar: omits the Status field, does not have Edit/Preview/Live or RSS Builder buttons.
The Member Toolbar only has two buttons: Logout and Change Password.
The features available on the toolbar are based on the highest role the user has in any group, so if a user is just a Member in one group but a Site Author in another group, that user will see the full Site Author toolbar. Certain options in the Page menu dropdown will be greyed out for Content or Document Authors, such as 'Delete Page'.
(More about User Roles)
Page Button : Opens dropdown menu of page options including New, Open, Copy, Delete, Publish, Workflow, and View Properties. Only a Site Author will have access to the complete menu, and only while in Edit Mode. (More about Pages and Site Authors)
Files Button: Opens the Document Explorer for file management including upload, edit properties, and view versions (Enterprise License only). (More about Document Explorer)Status Icons
Gold Star: Everything on the page has been published and is live on the site. (Preview and Live modes match)Pencil: Something has been edited since the last published version. This could be new/changed content, section, menu, or page. This icon will also display if the page has never been published.Pencil with Red Circle: Either the page or a piece of content has been marked for deletion. (Deletion is completed when the page or content is published)Edit/Preview/Live: Allows Content Authors and Site Authors to view the page in three different 'modes' for editing, previewing changes, and viewing the live site. RSS Builder: Opens a popup window that guides users through creating an RSS feed based on content author groups, topics, and other parameters and provides a URL to the RSS feed. (Future post: More about RSS Builder)Site Tools: Opens a new browser tab to view other administrative features, such as user administration, topic administration, and Site Map controls. (Future post: More about Site Tools)Aug 3, 2010
About Document Explorer – GeoDocs 8
All document formats are supported as well as images, audio, video and/or presentation formats, including all MS formats. They can be easily implemented into a web page or linked to a file to be opened separately. Non-technical users with security rights can add, edit, assign or un-assign files.
Documents are treated just like any other content type in GeoDocs, but with a few key differences:
How documents are the same as other content types:
Accessing Document Explorer from the toolbar:
The most direct way to access Document Explorer is via the GeoDocs toolbar at the top of your screen. Click on the button marked Files. (the toolbar will appear differently based on your role – 'Members' will not see this button in their toolbar)
 Note: It doesn't matter which mode (edit/preview/live) you are in before opening Document Explorer. This function doesn't apply here.
The Files button will open a large pop-up window showing the root folders on the left. Single left clicks will open each folder to drill deeper.
Folders
The folders seen in Document Explorer are only used to organize them for authors, and are not a mechanism for delivery on the website or intranet. Documents are delivered to visitors by direct links, dynamic sections (topics or date range), or as images within content. Folders are only seen by authors who have access to them. Folders don't influence security – it is possible to have a private document in a public folder, or vice versa.
Each group in GeoDocs automatically gets a root folder of the same name. By default, GeoDocs starts with two groups, and thus two folders: Administrators and Public. Users can see only the folders under the groups they belong to. For example, if user Tim123 is a "document author" in the Administrators group, a "member" of the Public group, and is not in the Human Resources group, he will see only the Administrators and Public folders, will be able to add/delete/change documents only in the Adminstrators folder, and will see no evidence that a Human Resources folder exists.
Create NEW folder – click the icon that looks like a folder with a green plus sign (mouseover text is "Create Folder")
Folders will default to be owned by the group that owns the Root folder (any folders created under PUBLIC will default to be owned by group PUBLIC) but can be changed so that one group could own a folder under another group's root folder.
Documents are treated just like any other content type in GeoDocs, but with a few key differences:
How documents are the same as other content types:
- Security: can be public or private
- Editing Access: properties edits or uploading of new versions can be restricted to certain user groups
- Properties such as topics and display date ranges allow dynamic delivery in sections, RSS feeds, or subscriptions
- Documents themselves are not edited directly in GeoDocs (but their properties are) and the EDIT screen is a bit different
- Every document has its own unique URL
- Document Explorer: documents are uploaded and organized through this special user interface
- Documents can be included within Basic (text) content as a link or an image
Edit/Preview/Live modes are not used to view changes to documents and won't change the view within Document Explorer
Accessing Document Explorer from the toolbar:
The most direct way to access Document Explorer is via the GeoDocs toolbar at the top of your screen. Click on the button marked Files. (the toolbar will appear differently based on your role – 'Members' will not see this button in their toolbar)Note: It doesn't matter which mode (edit/preview/live) you are in before opening Document Explorer. This function doesn't apply here.The Files button will open a large pop-up window showing the root folders on the left. Single left clicks will open each folder to drill deeper.
Folders
The folders seen in Document Explorer are only used to organize them for authors, and are not a mechanism for delivery on the website or intranet. Documents are delivered to visitors by direct links, dynamic sections (topics or date range), or as images within content. Folders are only seen by authors who have access to them. Folders don't influence security – it is possible to have a private document in a public folder, or vice versa. Each group in GeoDocs automatically gets a root folder of the same name. By default, GeoDocs starts with two groups, and thus two folders: Administrators and Public. Users can see only the folders under the groups they belong to. For example, if user Tim123 is a "document author" in the Administrators group, a "member" of the Public group, and is not in the Human Resources group, he will see only the Administrators and Public folders, will be able to add/delete/change documents only in the Adminstrators folder, and will see no evidence that a Human Resources folder exists.
Create NEW folder – click the icon that looks like a folder with a green plus sign (mouseover text is "Create Folder")
Folders will default to be owned by the group that owns the Root folder (any folders created under PUBLIC will default to be owned by group PUBLIC) but can be changed so that one group could own a folder under another group's root folder.Jul 26, 2010
User Accounts: Role Definitions
Group Administrators and Site Administrators have permissions to maintain User Account Security Roles.
- Security Roles are defined in the User Account or Group Properties.
A user may be assigned to one or more groups, with the same or different roles within each group. For example:
- User1 has the role of Member in the Employee Group (View only)
- User1 also has the role of Site Author in the Customer Service Group (Full rights)
Content Permission Roles
Member:
View all elements belonging to the user's assigned group, including pages, menus, sections, links and documents, etc.
Document Author:
View all elements belonging to the user's assigned group, including pages, menus, sections, links and documents. Also has permission to View, Create, Update, and Delete Documents for the group.
Content Author:
View all elements belonging to the user's assigned group, including pages, menus, sections, links and documents. Additionally the Content Author is able to View, Create, Update, and Delete Content, including documents and Sections (all available types/plug-in, including document) for the group.
Site Author:
Has Member, Document Author and Content Author permissions as well as the ability to View, Create, Update, and Delete Pages, Menus, and Links for the group. The Site Author has full site administrative rights to publish changes and perform maintenance in the group they are assigned. They do not have Security rights to manage Groups and Users.
GeoDocs Security filters searches and search results to return results based on user-defined security settings for protected content. Each site viewer is matched against their unique security profile and only content that is appropriate for them to have access to in "view only" or, more defined security such as edit, add, or delete, is presented to them.
Every element in GeoDocs™ can be arranged in a flexible manner where content, link, section, page, or menus can be made available for a department/group or site-wide. This includes features such as calendar and news/announcements.
User Administrator Roles
User administrator roles define administrative rights with Users, Groups, Templates, and Topics. These roles are independent of Authoring roles. Roles are managed in the User Properties and Group Assignment Properties of the Site Tools area.
Group Administrator:
A Group Admin is able to add, edit, and delete Users, Templates, Topics and Plug-Ins that belong to the GROUP in which they are assigned to be Group Administrator.
Example:
If User1 is a Member of the Employees Group and a Group Administrator for the Customer Service Group, he has the ability to maintain user, groups, templates, and topics that belong to the Customer Service Group only.
Site Administrator:
The Site Administrator Role overrides the Group Administrator Role. The Site Administrator has the authority to maintain all users, groups, templates, topics, and plug-ins in all groups.
Workflow Permission Roles
(Enterprise Edition only)
Approver: Has authority to approve or reject an item (page, document or content) submitted to a workflow process.
Subscribe to:
Comments (Atom)