Apr 26, 2011

How to Delete a Document

1.  Check out the content. Click the file name and select Check Out from the dropdown menu. You will be given the opportunity to comment, then click Check Out.


Notice there is now a pencil and a lock icon in the Status column to indicate the content is checked out to you and is changing from the published version.

2.  Mark for deletion. Click the file name and select Delete Content < Delete from System. Then click Yes, delete the content. in the popup window.


There will now be a pencil and a red circle icon, denoting that the content is marked for deletion.

3.  Publish the changes to complete deletion. 
  • With workflow, submit to workflow and then approve.
  • Without workflow, select Publish from the document dropdown menu.

Edit a Document (Upload New Version)

Editing documents must be done through applications on your desktop. Documents themselves cannot be edited from the browser. Instead, you can download the document to your PC, make edits, and then upload that file as a new version of an existing document. The URL will remain the same, so if a visitor follows a link to get to the document, or you’re replacing an image on the site, the user will only see the newest published version of the file.

Step 1: Download the document to your computer for editing.
  1. Open Document Explorer (click Files in the GeoDocs toolbar) and navigate to your document.
  2. Click the document name and select View Content Properties from the dropdown.
  3. On the Content History tab, click View next to the most recent published version of the document. This will give you the option to save the document to your computer. 


Step 2: Edit and Save the document on your computer.

Step 3: Upload the new version in place of the previous version.


  1. In Document Explorer, click on your document file name and this time select Edit from the dropdown menu.
  2. In the Edit Content window, on the Content Details tab, click Browse and select the file from your computer. At this time if you can also make changes to the properties or location of the document.

  3. Click Check In to check in and save the document. You will be given the opportunity to leave comments, then click Check In. You will now see a pencil icon next to the file name.

  4. Publish the document by either selecting Publish in its dropdown menu, or Workflow

Roll Back a Document to a Previous Version

Note: versioning and roll back are features only available in the Enterprise license level of GeoDocs.  

To view previous versions of content in Document Explorer, first click the FILES button in the main top toolbar.  Navigate through folders to a document.   Left click on a document name and then choose ‘View Content Properties’.

On the ‘Content History’ tab you can view previous versions of a document.  For web content, when you select “view” the content will be displayed in a content viewer pop-up window or downloaded to your computer to be opened by a desktop application, depending on the file type.

Content Properties as seen when document is checked in.  (No Save button or rollback option)


To roll back content, first check out the content by left clicking on the file name and selecting ‘Check Out’.  Left click the document name again and select ‘View Content Properties’.  On the ‘Content History’ tab you will now see the ability to roll back to earlier versions:

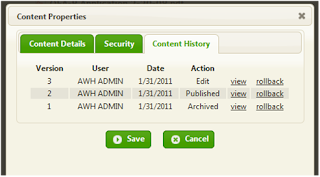
A third version of the document was created when it was checked out.


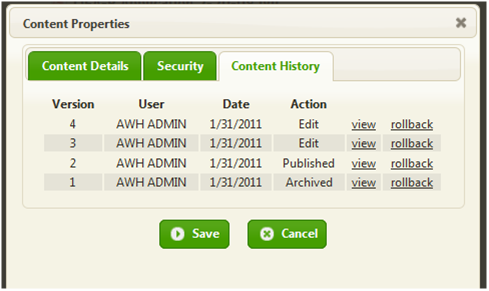
Click on ‘rollback’ next to the version you wish to restore, and then click ‘Save’.  The popup will go away and the content will now be checked out but looking like the version selected.  If you were to look at the Content History now, it would look like this:


Version 4 is a checked-out copy of version 1, which was selected for the rollback.  (Version 2 is the last published version that is currently live on the site, Version 3 was created when the content was checked out.)  The content can now be checked in and submitted to workflow for approval.